Wednesday, February 10, 2016

Minnie's (Lulu's) Bowtique Party!


My daughter turned 2 on January 24th. Me, being my typical passionate party planning self, started planning her party in late October (helloooo clearance Halloween candy anyone?). I always have my eye out for a steal and only like to spend $10-20 here and there to spread out my party spending! 


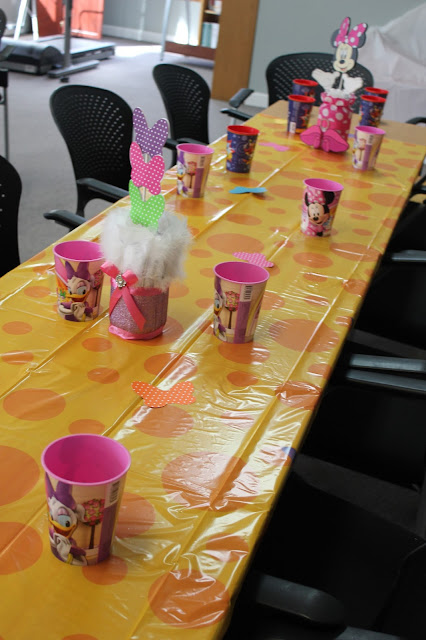
On eBay I found a lot (as in one lot) of Hallmark Minnie's Bowtique Dream party supplies, which were absolutely adorable! I don't usually go for licensed decor, but being as I am a full time student at the moment, this was a steal, AND made my life easier so WIN-WIN! I also found an air blown Minnie on EBay for a great deal. She made us really feel like Minnie was at our party celebrating with us!

I made Minnie centerpieces with wooden pumpkin push ins I had purchased at 75% off after Halloween! I just mod podged some pink polka dot fabric that I had leftover from a former project, and hot glued the shoes in front, the hands on the rim of the mason jar and used a portion of dollar tree foam glued inside the mason jar to poke her head into the middle! I made Daisy centerpieces with mod podge and glitter, leftover pink ribbon and feathers from my hair bow making stash! Since I didn't have a Daisy to insert in the middle I used the Minnie's bowtique store images for inspiration and recreated the flower pots with bows coming out of them! Surprisingly enough Wal-Mart's party cups are only 88 cents, which is of course less than $1 from Dollar Tree (still love my Dollar Tree!). 


I remembered from the previous year that around the Holidays, Groupon does a personalized M&M's deal, which I grabbed during one of their 20% one deal promos. What they don't tell you is that you will have to pay the $14.99 shipping! These were adorable, though I'm not sure that I will invest that much in M&M's again? 


The signs were made using the Waltograph font which is downloadable for free online. I only have a laser printer ( black and white) at the moment so I made all of the signs on Word and printed them and used ruffled edge scissors to cut around them, then pasted them onto random card stock that I already had from previous projects. 


The favors were collected from multiple places. Aliexpress.com was my favorite! Of course if you choose to order from China be sure to order about a month or more in advance. I ordered a set of 30 boutique style 4 inch bows for $9.97. I also ordered floating lockets which came with rhinestones around the face and a very basic chain for $1.80 each! The charms for the lockets were .99 cents for 10! I got a few different Minnie Mouse themed ones and birth stones, and a couple others for those who weren't as Minnie crazy as we are (a castle, Eiffel tower, and friendship heart).  The girls each got a pair of Minnie Mouse dress up shoes from the Disney Shop @ JcPenney's. This purchase was a total fluke. The shoes were not visibly marked down and were in the Minnie section. I went to purchase a pair for my daughter to wear with her birthday outfit, when they rang up $o cheap! So I went back and grabbed the entire rack and when I got to the checkout the total came to $$ and some change to which he says, " You have $$ in rewards, would you like to use it?" UH YEAH!  


The Cuckoo Loca plush were a steal as well costing .99 cents each with a free shipping promo on Disneystore.com! Each guest got to "shop" the bowtique with reusable mini Minnie totes I bought from the Dollar Tree.


And now.......THE CAKE! I am NO cake professional. I originally planned to make the cake my splurge....thinking I'd spend $50? After five quotes from area bakeries and grocery stores varying from $65-$100+, I decided I might have to make time to give it a go myself. I have had minimal work with fondant and frankly was afraid to totally FAIL. I did a lot of research on Pinterest for how to work with fondant and started about two weeks out from the party making the fondant and letting the ears and bow topper dry. Then I did a practice cake, which wasn't great, but wasn't terrible. The actual cake turned out great, except for the part where I didn't put support rods under the top layer, oops! The cake ended up resembling a topsy-turvey cake ( at least that's what I'm telling myself, haha) which you can see on the party table pics. A lesson for next time I guess! I purchased the Minnie's bowtique figurines from Disneystore.com, they are adorable and have been played with ever since!


We had a blast and managed to have a boutique party for nearly the price of Minnie's Bowtique's grand opening special..."two buttons a bow"!



Sunday, August 16, 2015

Time to toddlerize!

I've done it again.... Taken my sweet time moving my little one into a room of their own. The first one took me 3 years to officially move out! They are just so sweet and snugly and there's something so special about being awoken by tiny fingers poking you in the face or little arms squeezing your neck, seriously! My daughter is 18 months old now, and these past few weeks I have felt like it's time for the move to her own room. One problem, it wasn't quite a "big girl" room yet. 

I needed to toddlerize! I first tried to tempt her into her room by removing one side of the crib so she could climb in and out and it could be like a day bed. 

For some reason it just wasn't enough to entice her to want to sleep there, although our generalized playtime increased in her room after that point. I reorganized and hung up her "big girl" dresses and set out the best toys. We even tried both the portable crib rail and the pool noodle taped to the mattress, but I just didn't feel right about trying to make her sleep in her room yet. 

Luckily for me, my recent JBF consigner drop off caused me to stumble upon the most adorable toddler bed. It wasn't just the bed, it was also the great deal I got on it that made it all come together! 


I drove home with my toddler bed in the back and a full tank of motivation to get her room toddlerized and ready! 

We cleaned and organized the closet!


We switched around the setup a bit....

And tonight my sweet girl has officially fallen asleep in her own room...though it took quite a few more rounds of,"You are my sunshine," than usual. I'm kind of sad, but I know this will be good for all of us! 

Monday, May 18, 2015

Love to JBF Columbia,Mo!

have never been so compelled to report a shopping experience as I am right this moment! I have grown to LOVE kids consignment sales. I sell and browse and when I find top quality items I BUY BUY BUY,of course! The last consignment sale I went to had a few things but not near as much as I've found the last two days at JBF (Just Between Friends) Columbia,MO. I consigned with this sale and when I went to drop my items off I was literally welcomed with open arms! I was treated like a family member and given a detailed explanation of how setup works and was also given assistance along the way when I had any questions. As I hung my items to be inspected I marveled at the organization of everything and how easy it was to find where things needed to be placed! I eagerly placed my items on the sale floor and tucked my presale pass into my back pocket for safe keeping, waiting ever so impatiently to come shop. I showed up to the presale and lucky for me the setup made it so that even though others were shopping as well, there was plenty of space for everyone to shop and move about the racks without feeling crowded. I saw so many nice things but decided to go for the items that would remain full price throughout the sale and come back in hopes of snatching the items that would go half price! All of the clothing items I scored for my little missy were name brands; Gymboree, baby Gap and First Impressions (Macy's). Here is the breakdown of my clothing score from both days....


Gymboree Tropical Bloom dress, bloomers and matching sandals $11 (my most expensive purchase) I had gotten the matching swimsuit for this line at Children's Orchard $5 fill-a-bag sale, so had to have these to wear with it to the pool!
Gymboree Ice Cream Sweetie outfit $3 (half price item)...
Gymboree Palm Beach Paradise outfit $6...
Gymboree Surf Shack shorts $2! These just so happened to be from the same line as a top that was a random grab from the same Children's Orchard's $5 fill-a-bag sale last fall (luck follows me shopping sometimes I just can't explain, haha)!

Baby Gap super adorable floral swimsuit $3... And last but not least...

First Impressions embroidered dress/top $2.50 (half price item)!

I am super excited to have completed my  daughters summer wardrobe for just a little over $25! I have recently become a Gymboree addict and noticed many of their lines at the sale! I also managed to snag the Step II kitchen set below, with a tub of food/dishes at the 50% off presale for $20!!!!!! 

And let's not forget the adorable wooden rocking chair and Wizard of Oz (Little People-style) 75th edition play set for my missy moo as well! I am so pleased with everything about the JBF Columbia sale, my consigning experience, the organization,the selection, the prices, just everything! Spread the word mid-MO mommies this sale is the place to be! If you are lucky enough and are reading this,tomorrow, May 19th, will be the last day for this sale. They are open from 8am-1pm. It is 50% off day, meaning all items without a star on the tag are half price! If by some chance you miss this sale, don't fret, they'll be back in August.......and I'll be ready!


Sunday, May 3, 2015

50% off lunch meat + "day old bread" from Jimmy Johns = awesome budget sandwich!

What do you pack when you have a picnic? There's the fruit, the deli meat, the chips, the drinks, dessert maybe? Well here are some secrets I've stumbled on to jazz up your picnic, yet keep you on a budget! 

I stumbled across this first tip by accident a few years back when grocery shopping later than usual. The deli at our local Walmart was about to close and all I needed was some turkey lunch meat for my little guys lunch. The guy at the counter told me that within the last hour before close all pre-sliced meats are 50% off! They can't very well sell those slices in the morning so if there are any pre-sliced meats(and by that I mean their more regular meats that they have cut to pack readily throughout the day to save time cutting per order) snatch em up! 


What you're going to do next on the way home is swing by Jimmy Johns and buy a baguette or two of "day old bread" which will run you anywhere from .15-.50 cents a baguette depending on which one you go to. I can't guarantee that they will always be available, but I've never had a problem getting a few anytime I've needed!


Both of these tips would be great to use for picnics or to surprise someone with a packed lunch upgrade (the bread totally MAKES the sandwich at Jimmy Johns). I  have even thought of doing this for one of my kids birthday party food ideas! I have so far always gone for pizza, but next party I will definitely try making subs from day old bread!

Also, I have used "day old bread" to make garlic bread and it can be used in other variations as well (I saw somewhere where someone made cinnamon toast with it ,yum). So go get your 50% off deli meat, your "day old bread", and sit there eating your grub with a smile on your face knowing all of your sandwich supplies ( to make 3 or 4 baguettes worth of sandwiches) cost the same as a slim 4! 

Thursday, April 30, 2015

Repair kids sequined sparkly Tom's


A month ago I found an awesome deal on some Tiny Tom's they were past season leftovers from the year before that the staff so kindly brought out from the back. They were Sparkly, striped and my favorite colors and only cost $19 new! I bought them for my little missy anticipating her wearing them for spring/summer. 


Well little missy started walking and apparently had a major growth spurt leaving me trying to shove those tootsies into the pair I had gotten like one of Cinderella's step-sisters and her glass slipper. It was NOT happening! Being unwilling to buy a new pair for $40, I snagged a nice silver sequined pair on eBay for a fraction of the price. Shout out to eBay! I'm a little obsessed as of late, having been "out of the game" for a few years. 


Anyways, the shoes arrived and while they were super cute and in good condition, some of the sequins/sparkles appeared to have washed away or fallen off in spots leaving white where the sparkle should have been. Although it wasn't too noticeable I decided that since they were a second hand pair and cost next to nothing, I'd bust out my mod podge and glitter and give these babies some extra new shine! In keeping with the structural design I dabbed on a thin layer of mod podge ( the gloss finish kind), and sprinkled on some silver glitter. I then carefully applied a top layer making sure to smoothe any bubbles with my brush. After the shoes dried I felt like I had a brand new pair!
Here they are on my Missy's feet!

*the ones on the right are the before

(The above two pictures pics show them freshly glittered before the top coat)

 It's so worth it to try this!  And you can fix up any patches that may run off in the future as well. Only took me 10 minutes, dried in an hour! This can be done with non-sparkly toms as well, just be sure to coordinate the glitter with the elastic middle bit on the top of the shoe for better aesthetics! Happy crafting!


Saturday, March 14, 2015

Vintage tablecloth becomes boutique inspired ensemble


I was feeling crafty last evening so I took my little darlin and we went goodwill hunting (I think that's actually a movie title, haha)! I'm ever on the look out for a cool challenge or something I can turn into something else. While browsing in the linen section I came across this really colorful lace trimmed square tablecloth which appears to be circa 1970's. It's really funky! I have recently been warming up to some of the boutique style outfits I used to think we're kind of ridiculous looking (back then I was a boys only mama, no froof, no bows, no lace). I snatched up my $4 tablecloth and home I went to envision/ brainstorm what to do with it exactly. So here is my tablecloth....
I was so eager to start crafting I had forgotten to take one of it before cutting it, woops! Last night I spent making this little summer dress, which just needs a bit of elastic in back to be completed....
Then this morning I decided to make a skirt and embellish an old onesie. I came across a pair of leggings that were a tad short on Lu and decided it wouldn't hurt to use those either! Here's what I came up with using the tablecloth, some scrap fabric and a tiny extra bit of bias tape I hade in my supply box
It's a little funkier than I usually dress my Lu but I still love it! I'm no great sewer, so if you are looking at any of the projects I've done and are hesitant to try, don't be! Take the plunge, start sewing, it looks a lot harder than it is. And if you are like me, you aren't concerned about how pretty your seams look underneath, because it's just for your own use anyways! Have a crafty weekend!

Friday, March 13, 2015

The Very Hungry Caterpillar clip


This will be a quick one guys! As a part of our school districts reading awareness week, my son was encouraged to dress as his favorite book character for school today. My son is all about dressing up and being goofy, AT HOME. But now that he's a bit older it was an idea that was a little outside his comfort zone. So to I decided to throw out some ideas. I made a brown paper bag into  Little Critter's  "hair" but even that was too much of a costume. So I took 5 mini craft pom poms (two dark green, two lighter green, and one red) and hot glued them to felt and added some felt eyes and a mouth and a pipe cleaner set of antenna to make The Very Hungry Caterpillar clips with a metal clip from my daughters hair bow supplies. 


He was 100% ok with clipping the little guy on like a tie clip and we he wore a red polo shirt with buttons so it would work and match his caterpillar clip. Voila,dress up as your favorite book character day was a success! The little guy turned out so cute I made a few more and used one for sister's hair to match her Eric Carle Gymboree outfit. These would make great party favors or clips to decorate party bags or add to big red lanterns (like apples) and they are gender neutral!  They were super easy to make and take only minutes. If you plan to make more than one I would suggest glueing all of the body Pom poms down on the same sheet of felt and just cutting them out at the end. I did notice glueing them to green felt seemed to blend better for hair clip wearing, but I did use white as well and it didn't turn out bad!